2015/11/11(水)人工太陽の光源
ヒョロいのが理由だけど、ヒョロいのは最初に1W三個で栽培していた時期に発芽したもので、LEDを増やした後のものはしっかりしているようだ。
杞憂だったっぽいけど、ちょっと思うところがあって白色LEDの波長を調べてみた。
シャーフ銭形の解説書
LED ウォームホワイト 波長
色温度 3500K のウォームホワイトだと、植物栽培に使えそう。赤色の波長が660~670nmでは弱いけど、これはこの波長が最適、というだけで光合成には広い波長が使われるので、エネルギー効率が多少下がるというくらいの事で済みそう。
何が良いかといえば、赤い怪しげな光ではなく、白色光なので居室にあっても違和感がない。
これを加えてみたい。
2015/10/11(日)廊下や階段その2
onになっている時間は、センサ側回路にコンデンサと可変抵抗が付いていて、それで調整するようになってるのでArduinoは稼働状況を確認するのに使えるけど、基本的な動作には必要ない。
LEDの所に、大電流用のソリッドステートリレーとかを繋げれば100Vの照明にも繋がる。
初心者としては電子回路に100Vの回路を混ぜるのはこわいので、リレーを使う方が楽ちん。
玄人はダーリントントランジスタとかいう謎テクを使うらしい。
2015/10/10(土)人工太陽の続きの続き
カルビン回路の中で、光が必要なタイミングだけ光を照らしてブドウ糖を作ってる時は光を消す、つまり、カルビン回路の回転とLEDの点灯を同期させるというものすごい調整をするんだそうです。
作ってみたいから作る。
2015/10/10(土)廊下や階段
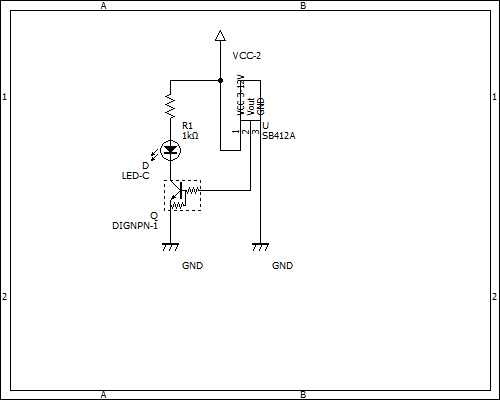
SB412A
Arduinoのdigital8にセンサー、digital6にLEDとかリレーとかデジタルトランジスタをつける。
ズボラなので、センサーのon時間を調整した時に自分で測らなくていいように、常に記録させてる。
int SENSOR = 8;
int OUTPIN = 6;

void setup() {
  // put your setup code here, to run once:
  pinMode(SENSOR, INPUT);
  pinMode(OUTPIN, OUTPUT);
  Serial.begin(9600);
}

void loop() {
  // put your main code here, to run repeatedly:
  delay(1000);
  static int cur = 0, prev = -1, t = 0;
  char stat[4];
  cur = digitalRead(SENSOR);
  if (prev == cur) {
    t++;
  } else {
    digitalWrite(OUTPIN, cur);
    Serial.print("Time: ");
    Serial.println(t);
    Serial.print("Now: ");
    Serial.println(cur ? "on" : "off");
    prev = cur;
    t = 0;
  }
}
2015/10/06(火)Arduinoでもタイマー
電池付きのRTCモジュール。
http://www.amazon.co.jp/dp/B00VP8EAFW
RTC操作用ライブラリ
https://github.com/SodaqMoja/Sodaq_DS3231
LCDも付けてあるけど、それは置いておいて。
時刻は律儀に変換しなくても、yyyymmdd の大小を比べれば過去か未来かわかる。
#include <Sodaq_DS3231.h>
#include <Wire.h>
#include <LiquidCrystal.h>

// initialize the library with the numbers of the interface pins
LiquidCrystal lcd(12, 11, 5, 4, 3, 2);

//DateTime dt(2015, 10, 07, 01, 17, 0, 3);
void setup() {
  Serial.begin(9600);
  Wire.begin();
  rtc.begin();
//  rtc.setDateTime(dt);
  // put your setup code here, to run once:
  lcd.begin(16, 2);
  // Print a message to the LCD.
  lcd.print("Artificial Sun for PAXI");
  pinMode(7, OUTPUT);
}

void loop() {
  char buf[16];
  int deg, hm, lighton, lightoff;
  delay(250);

  // set the cursor to column 0, line 1
  // (note: line 1 is the second row, since counting begins with 0):
  lcd.setCursor(0, 1);
  // print the number of seconds since reset:
  DateTime now = rtc.now();
  rtc.convertTemperature();
  deg = rtc.getTemperature();
  snprintf(buf, 16, "%02d:%02d:%02d %0d deg", now.hour(), now.minute(), now.second(), deg);
  lcd.print(buf);
  Serial.println(buf);

  // blink
  //digitalWrite(7, now.second() % 2 ? HIGH : LOW );

  // timer
  snprintf(buf, 5, "%02d%02d%02d", now.hour(), now.minute());
  hm = atoi(buf);
 // if (hm > 700 && hm < 1800) {
 if (hm > 115 && hm < 119) {
    digitalWrite(7, HIGH);
  } else {
    digitalWrite(7, LOW);
  }
}